THE COSMAC 1802 microprocessor can serve as the heart of a relatively inexpensive (about $100) microcomputer trainer that also features powerful application and expansion capabilities. The microprocessor circuitry here can also serve admirably as the basis for a variety of control applications, such as a security system, electronic games, time delay control, sequential lighting, temperature sensing, and so on.
The basic computer--COSMAC ELF--was originally introduced as a perforated-board project last year in POPULAR ELECTRONICS, followed by a series of articles that introduced new features. Elf II, presented here, incorporates all these upgraded features plus new ones, as follows.
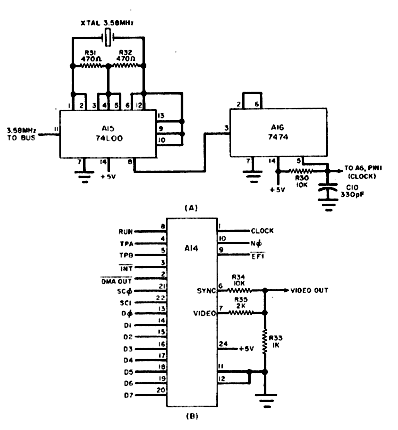
Figure 2. The crystal controlled clock (A) uses a conventional
color-TV crystal and drives the one-chip graphics interface (B).
[large TIFF]
[medium GIF]
[small GIF]
The Basic Elf
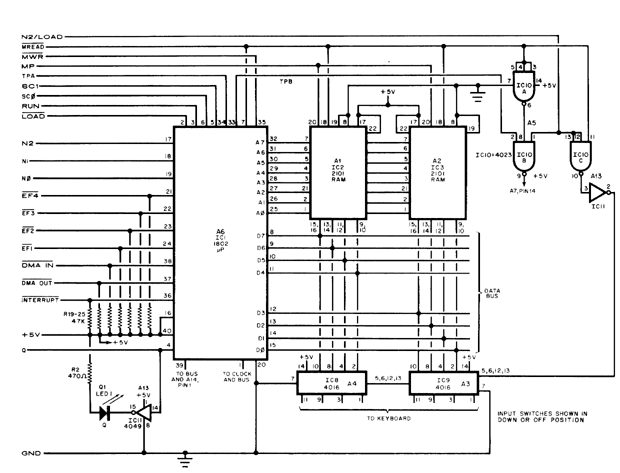
The basic computer circuit shown in Fig. 1, and the graphics
interface shown in Fig. 2 are essentially the same as the original Elf's.
Whereas the original Elf used a pair of relatively expensive hexadecimal decoders/latch/readouts to monitor the data lines, Elf II uses a pair of conventional 7-segment LED displays to do the same thing. Besides the saving in cost, the only difference between the two approaches is that in the Elf-II method, lower-case 'b' and 'd' are used instead of capital letters. However, these cannot be mistaken for any other alphanumeric character. The new circuit is shown in Fig. 3. integrated circuits A8 and A12 accept the digital information from the data bus--buffered by A7 and A11-- and convert this data to drive the common-cathode 7-segment LED readouts forming DIS1. Besides the data information. this circuit also accepts the strobe signal coming from A5 of Fig. 1 (the original IC1O, pin 9).
The original Elf used eight discrete toggle switches to insert data. In contrast, Elf II incorporates a calculator-type hexadecimal keypad, which is much simpler to work with.
As shown in Fig. 4. the calculator-type hex keypad contains normally open-momentary close spst switches in the matrix. The keypad is decoded by A10, which features a 2-key rollover. The output of A10 is used to drive data bus driver A3, and at the same time also drive A9. The latter drives data bus driver A4. Keyboard decoder A10 contains its own internal oscillator (used to sample the keys); its frequency is determined by the external passive components.
The "front panel" circuit is shown in Fig. 5. The RUN (S4), LOAD (S3), and MEMORY PROTECT (S2) switches can be locked in either the on (down) or off (up) positions. To use these switches, simply depress to turn on; and depress again to unlock and turn off.
Bus
The Elf-II has been provided with an 86-line (twin 43) bus structure to
carry the signals shown in Fig. 6. Note that at this time, only the
even-numbered connections are used, excepting pins 1 and 3 which carry the
+5-volt supply. All of the 1802 signals are present on this bus. which
includes the system +5 volts, ground, and the 3.58-MHz signal from the video
clock. Any connections made to this bus must be buffered if a CMOS device
is not used.
The use of this bus, not present in the original Elf design, will allow easy system expansion for added memory, I/O ports, cassette or printer interface, ROM operating system, or an alphanumeric keyboard.
Construction
Elf-II is constructed on a double-sided pc board such as that shown in Fig 8,
along with the component placement. If desired, the system may be wire-wrapped
using perforated board and wire-wrap sockets and component pins.
Observe the correct polarity when installing the electrolytic capacitors, LED (Q1), as well as the pin-1 identifiers on all the ICs. Sockets are suggested for all IC's. This is especially important for the two memory chips (Al and A2) so that they can be easily removed when expanding the memory via the new bus.
The keypad switches are installed by properly orienting them and inserting their plastic alignment pins in the appropriate holes at each switch position. The correct key placement is shown in the photograph. Make sure that the tops of all keys, including the control keys, are the same height above the PC board before soldering the leads in place. Also be certain that the RUN, LOAD, and MEMORY PROTECT (P) switches can be locked down (on) or up (off) before soldering
There are 10 solder pads along the upper right-hand corner of the board the two rightmost pads accept the 6.3 volts ac from the off-board transformer while the third pad is connected to an earth ground. The two leftmost pads are for the video output wth the leftmost pad for ground and the pad next to it for carrying the video signal to be connected to the CRT monitor or converted television set.
               ELF
   Connector Name    1802 pin #
        2    +5 volts   -
        4    +5 volts   -
        6    clock      1
        8    clock     39
       10    /LOAD      2
       12    /DMA IN   38
       14    /RUN       3
       16    /DMA OUT  37
       18    Q          4
       20    INT       36
       22    SC1        5
       24    /MWR      35
       26    SC0        6
       28    TPA       34
       30    MREAD      7
       32    TPB       33
       34    D7         8
       36    A7        32
       38    D6         9
       40    A6        31
       42    D5        10
       44    A5        30
       46    D4        11
       48    A4        29
       50    D3        12
       52    A3        28
       54    D2        13
       56    A2        27
       58    Dl        14
       60    Al        26
       62    D0        15
       64    A0        25
       66    /EF1      24
       68    N2        17
       70    /EF2      23
       72    N1        18
       74    /EF3      22
       76    N0        19
       78    /EF4      21
       80    GND       20
       82    GND       20
       84    not conn.  -
       86    3.58MHz    -


         Note Odd numbered pins on left side of
         connector (with the exception of pins 1
         and 3 which are +5 volts) are not used
         at this time.
As many of the IC's are CMOS types, extra care must be taken in both handling and installing them. Hold the IC's by the case edges, not the pins. Keep one hand on the board foil pattern when installing the IC's to prevent static build-up, then install the IC's in their proper places using the component placement guide of Fig. 8. Make sure that you observe all pin-1 designators.
Other than installing bus connectors, the Elf-II should now be assembled and ready for testing. However, before turning on the power, recheck the board for correct installation of all components. Then check to see if there are short circuits between any closely spaced pc foil traces.
There are two tests that can be made to check Elf II operation. The first uses the flashing of the Q1 LED to check computer operation, while the second test checks out video operation.
Program 1, listed in an accompanying table, is the computer test. Before
entering this program the Elf-II must be powered. To do this, connect the
secondary of the 6.3-volt. 400-mA transformer to the two screw terminals at
the right side of the 10-pad connector strip. Connect the primary of this
transformer to the line power. When the Elf-II is powered, the two displays
should indicate a random pair of hex digits. Make sure that the three control
switches - RUN, LOAD. and P (memory protect) are all in their up (off)
positions. Placing the LOAD switch in its down (locked) position auto-
    PROGRAM 1 Q-LED TEST

  Memory
  Location  Data
  0000      7A
  0001      F8 10 B1
  0004      21
  0005      91
  0006      3A 04
  0008      31 00
  000A      7B
  000B      30 01
Release the LOAD switch and, using the hex keypad. touch the two keys associated with the first op code of Program 1. (This is 7A.) Then depress the INPUT key. The data (7A) will then appear on the two readouts. In the same manner. insert the remainder of Program 1 into the system.
When the complete program is in memory, move the LOAD switch back to its upper position. Then depress the RUN switch, which will lock down. You should observe that the single LED alongside the two 7-segment readouts will start to flash.
To test the graphics output, connect the CRT monitor to the two connector strip screws that carry the video outputand ground (be sure that you connect ground to ground). DO NOT use any
      PROGRAM 2 VIDEO TEST

      Memory Location    Data

Start      0000        90 B1 B2
           0003        B3 B4
           0005        F8 2D A3
           0008        F8 3F A2
           000E        D3

Return     000F        72
           0010        70

Interrupt  0011        22 78
           0013        22 52
           0015        C4 C4 C4
           0018        f8 00 B0

Refresh    001E        80 E2
           0020        E2 20 A0
           0023        E2 20 A0
           0026        E2 20 A0
           0029        3C 1E
           002B        30 0F

Main       002D        E2 69
           002F        3F 2F
           0031        6C A4
           0033        37 33
           0035        3F 35
           0037        6C
           0038        54 14
           003A        30 33
With the CRT monitor connected and power applied, a raster should be seen on the screen. Using the same technique that was used to load the flashing LED program, load Program 2, the video test software. Once loaded, depress the RUN switch, and note that the CRT monitor should synchronize to the Elf-II sync signals and display a stable raster, with a "cloud-line" display near the top of the raster. This cloud-like layer is actually the program you just inserted. The 1's appear as bright boxes, while the 0's are represented as black boxes. (Refer to POPULAR ELECTRONICS July, 1977 issue for further details on how to animate the display.
Adjust the CRT monitor brightness and contrast controls for the best picture. If the sync appears to be unstable, or there does not seem to be enough contrast, one or two resistors in the Elf-II might require a different value, to increase or decrease the sync level. For instance, resistor R34's value can be changed. To make changes in the video level, R35 can be altered. Neither resistor affects circuit operation, just the level of its associated video source.
Programing. Although learning to program the 1802 is not very difficult, training and practice are required. The reader is urged to purchase the COSMAC User's Manual, which is available from your local RCA distributor or from the source listed in the parts list. The reader is also urged to read the four "Build the COSMAC Elf" articles that appeared in POPULAR ELECTRONICS. They include details on programming as well as how to animate a video display.
 Last modified:
15 April 2000
Last modified:
15 April 2000

![[small GIF]](pix/e5_p03a_s.gif)